
Most people know roughly what they earn each month. Far fewer know exactly what they spend. That gap between perceived and actual spending is where financial plans fall apart. A rent payment or car loan is easy to remember because it is the same every month. But the variable stuff, groceries, dining out, impulse purchases, subscriptions you forgot about, adds up faster than most people expect.
A monthly expense tracker closes that gap. It gives you a clear, organized picture of where your money goes over a full billing cycle, which is the natural rhythm most financial obligations follow. Whether you use a notebook, a spreadsheet, or an app, the core idea is the same: record what you spend, review the totals, and adjust.
This guide covers four practical methods for tracking monthly expenses, compares their strengths and weaknesses, and walks through how to pick the right one for your situation. If you want a broader introduction to the concept, our guide on what is expense tracking covers the basics.
Why Monthly Is the Right Tracking Interval
Weekly tracking is too granular for most people. Yearly tracking is too slow to catch problems. Monthly tracking hits the sweet spot, and there are structural reasons for that.
First, most recurring bills are monthly: rent or mortgage, utilities, insurance, phone plans, streaming services, gym memberships. Tracking on the same cycle as your obligations means you can directly compare income against outflow without converting between time periods.
Second, most paychecks land on a monthly or bi-monthly schedule. Matching your tracking period to your pay period makes it easier to answer the most important question in personal finance: did I spend less than I earned this month?
Third, a month is long enough to smooth out daily fluctuations. You might spend $200 on groceries one week and $60 the next. Monthly totals absorb that noise and show you a more stable picture of your actual habits.
For people who want more granular visibility alongside their monthly view, our guide on how to track daily spending covers techniques that feed into your monthly totals.
The 4 Methods for Monthly Expense Tracking
There is no single best way to track monthly expenses. The right method depends on how much time you want to invest, how detailed you need the data to be, and whether you prefer analog or digital tools. Here are the four main approaches.
Method 1: Pen and Paper
The simplest method. Carry a small notebook and write down every purchase as it happens. At the end of the month, add up totals by category.
How to set it up:
- Create a page for each spending category (groceries, dining, transport, etc.)
- Write the date, merchant, and amount for each purchase
- Total each category at the end of the month
- Compare totals against your income
Best for: People who make fewer than five transactions per day, prefer physical writing, and want zero screen time in their financial routine.
Drawbacks: No automatic calculations. Easy to forget entries. Hard to spot trends across multiple months without creating separate summary pages. Most people abandon pen-and-paper tracking within six weeks because the manual overhead grows as data accumulates.
Method 2: Spreadsheets
Spreadsheets give you the analytical power that pen and paper lack. You can use formulas to auto-calculate totals, build charts, and compare months side by side. Both Excel and Google Sheets have free expense tracker templates, or you can build your own from scratch.
A basic monthly spreadsheet structure:
| Date | Description | Category | Amount | Payment Method |
|---|---|---|---|---|
| 03/01 | Whole Foods | Groceries | $87.40 | Debit card |
| 03/01 | Spotify | Subscriptions | $11.99 | Credit card |
| 03/02 | Shell gas station | Transport | $48.00 | Credit card |
| 03/02 | Chipotle | Dining | $14.25 | Cash |
At the bottom of the sheet, use SUM formulas grouped by category to generate a monthly summary. Add a second tab that pulls in totals from each month so you can track trends over time.
Best for: People comfortable with spreadsheet software who want full control over their data layout and analysis. Also useful for anyone who needs to export or share expense data for tax or business purposes.
Drawbacks: Requires manual data entry for every transaction. Setup takes time, especially if you want charts and multi-month comparisons. Spreadsheets do not remind you to log expenses, so consistency depends entirely on your discipline.
For a deeper look at month-over-month analysis using this approach, see our guide on how to compare monthly spending.
Method 3: Printable Templates
Templates are a middle ground between pen-and-paper and spreadsheets. You download a pre-formatted PDF, print it, and fill it in by hand. Many templates include pre-built category sections, weekly subtotals, and a monthly summary area.
Where to find them: Microsoft Office, Canva, and dozens of personal finance blogs offer free monthly expense tracker templates. Most follow the same basic layout: a grid with dates down the left side and categories across the top.
Best for: People who like the tactile experience of writing but want more structure than a blank notebook. Also good for households where both partners want a shared physical document on the fridge or desk.
Drawbacks: Same limitations as pen-and-paper, with no automatic calculations. You still need to add up numbers manually. Templates are also rigid; if your spending categories do not match the template, you end up with irrelevant columns and missing ones you need.
Method 4: Expense Tracking Apps
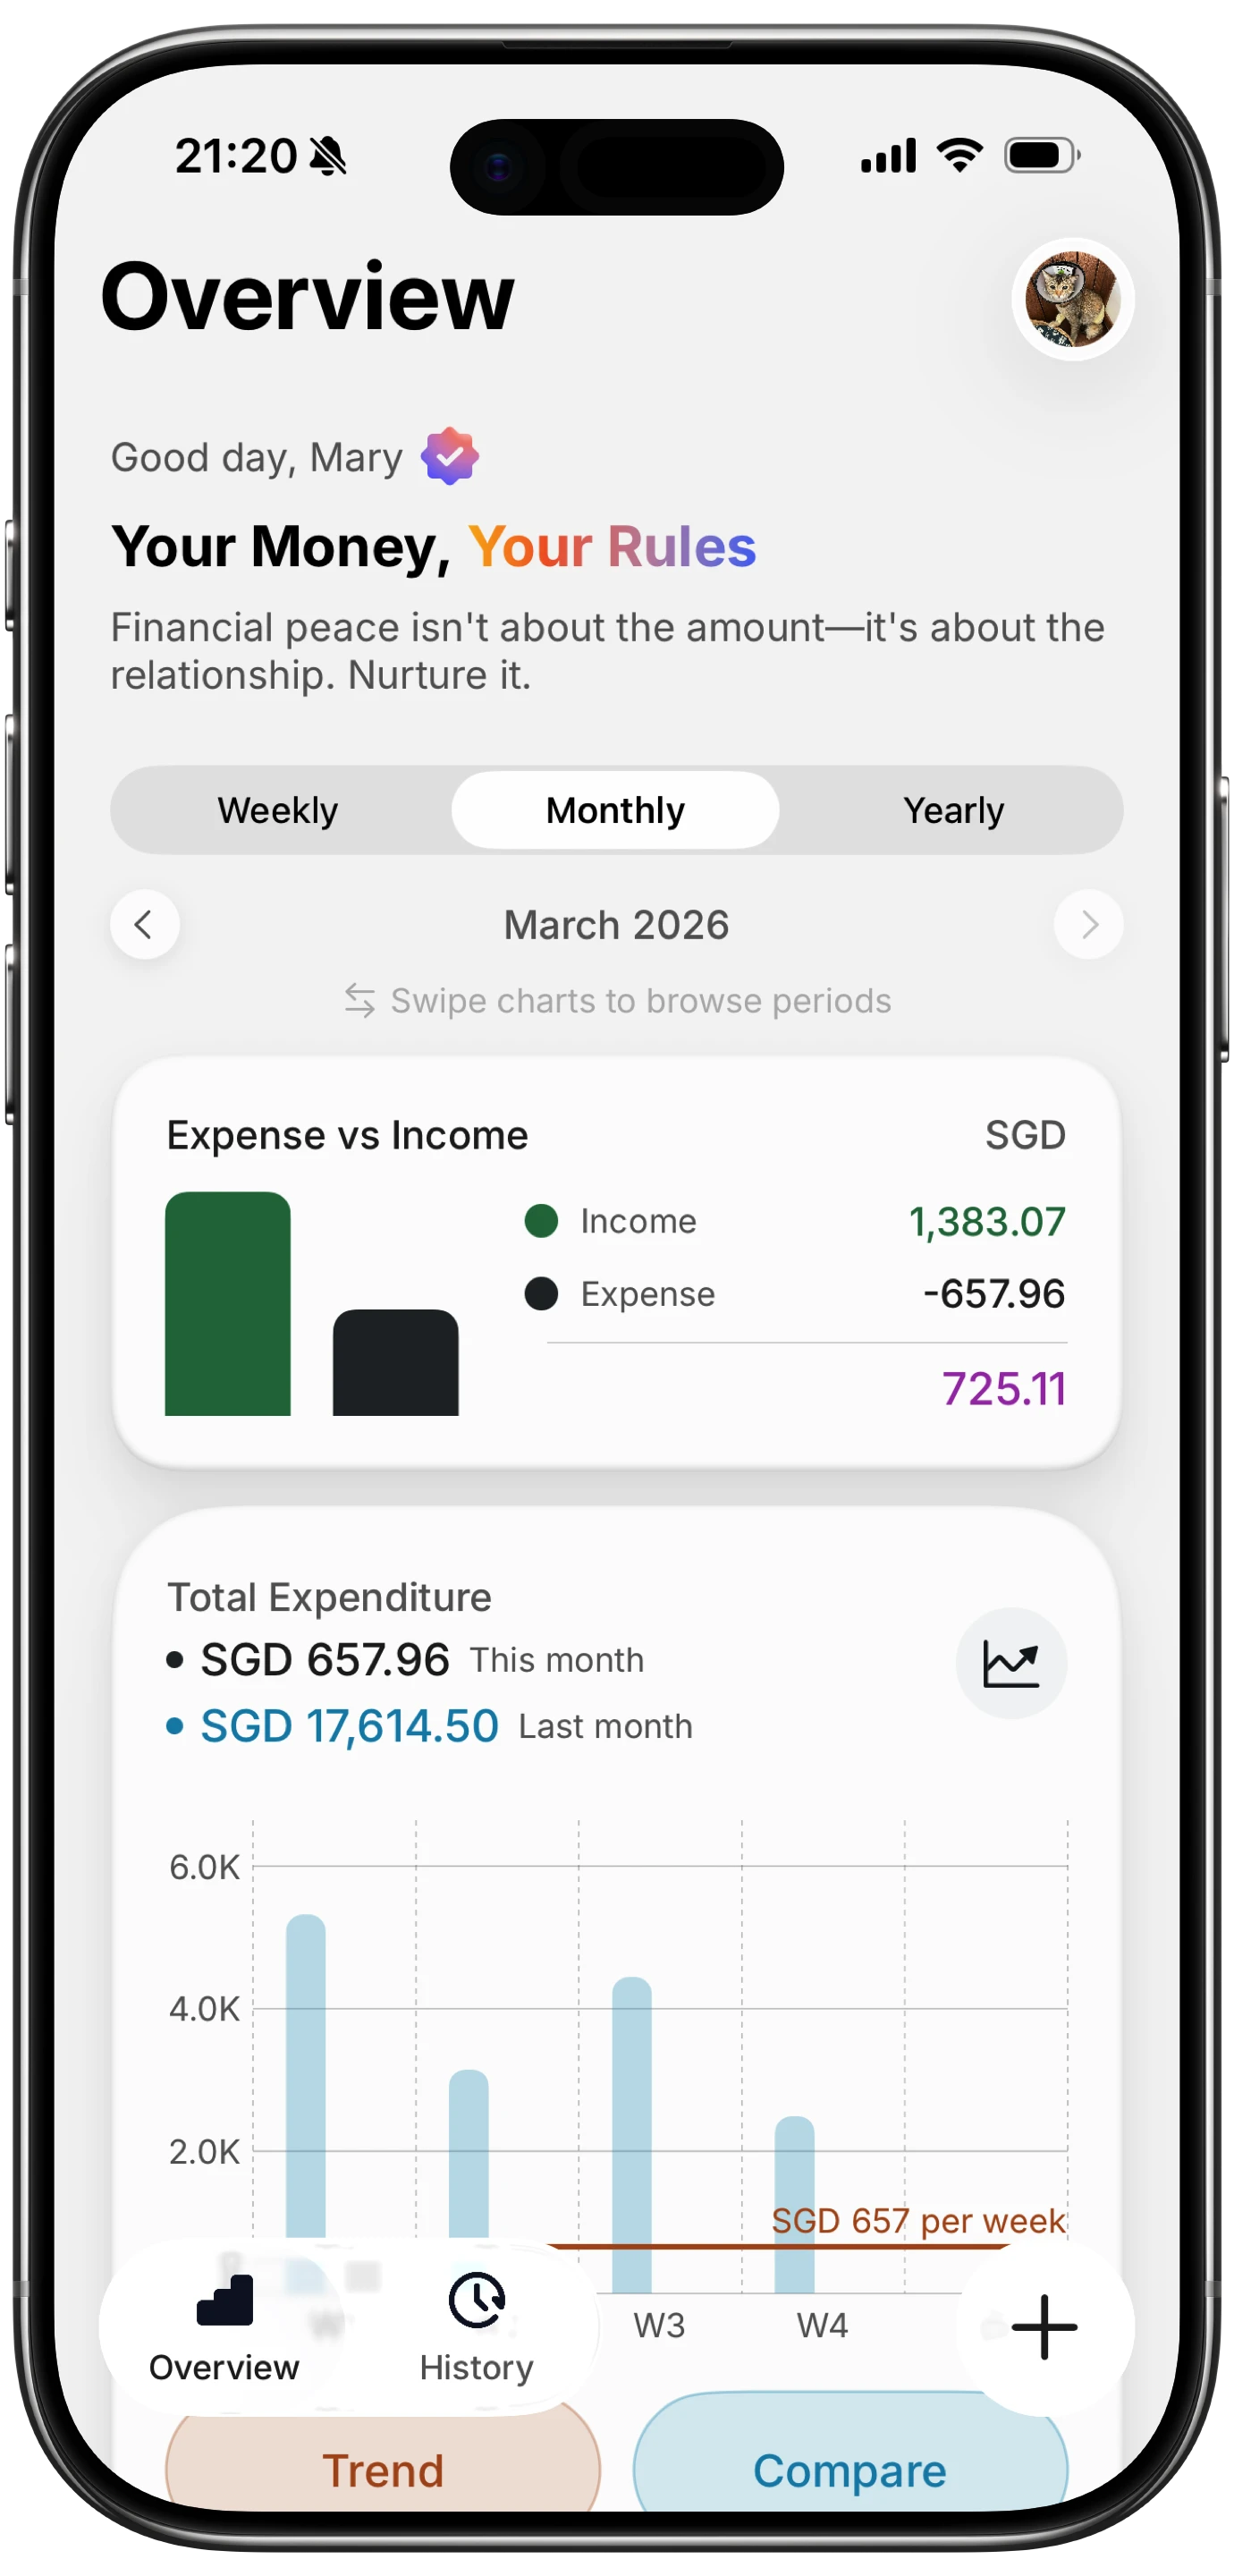
Apps are the most popular method for monthly expense tracking in 2026, and for good reason. They handle the parts that make other methods fail: automatic categorization, instant calculations, visual charts, and reminders to log your spending.
There are two broad categories of expense tracking apps:
Bank-linked apps connect to your financial accounts and pull transactions automatically. Examples include Monarch Money, YNAB, and PocketGuard. The advantage is full automation. The tradeoff is that you share your bank login credentials with a third-party service, and cash transactions still need manual entry.
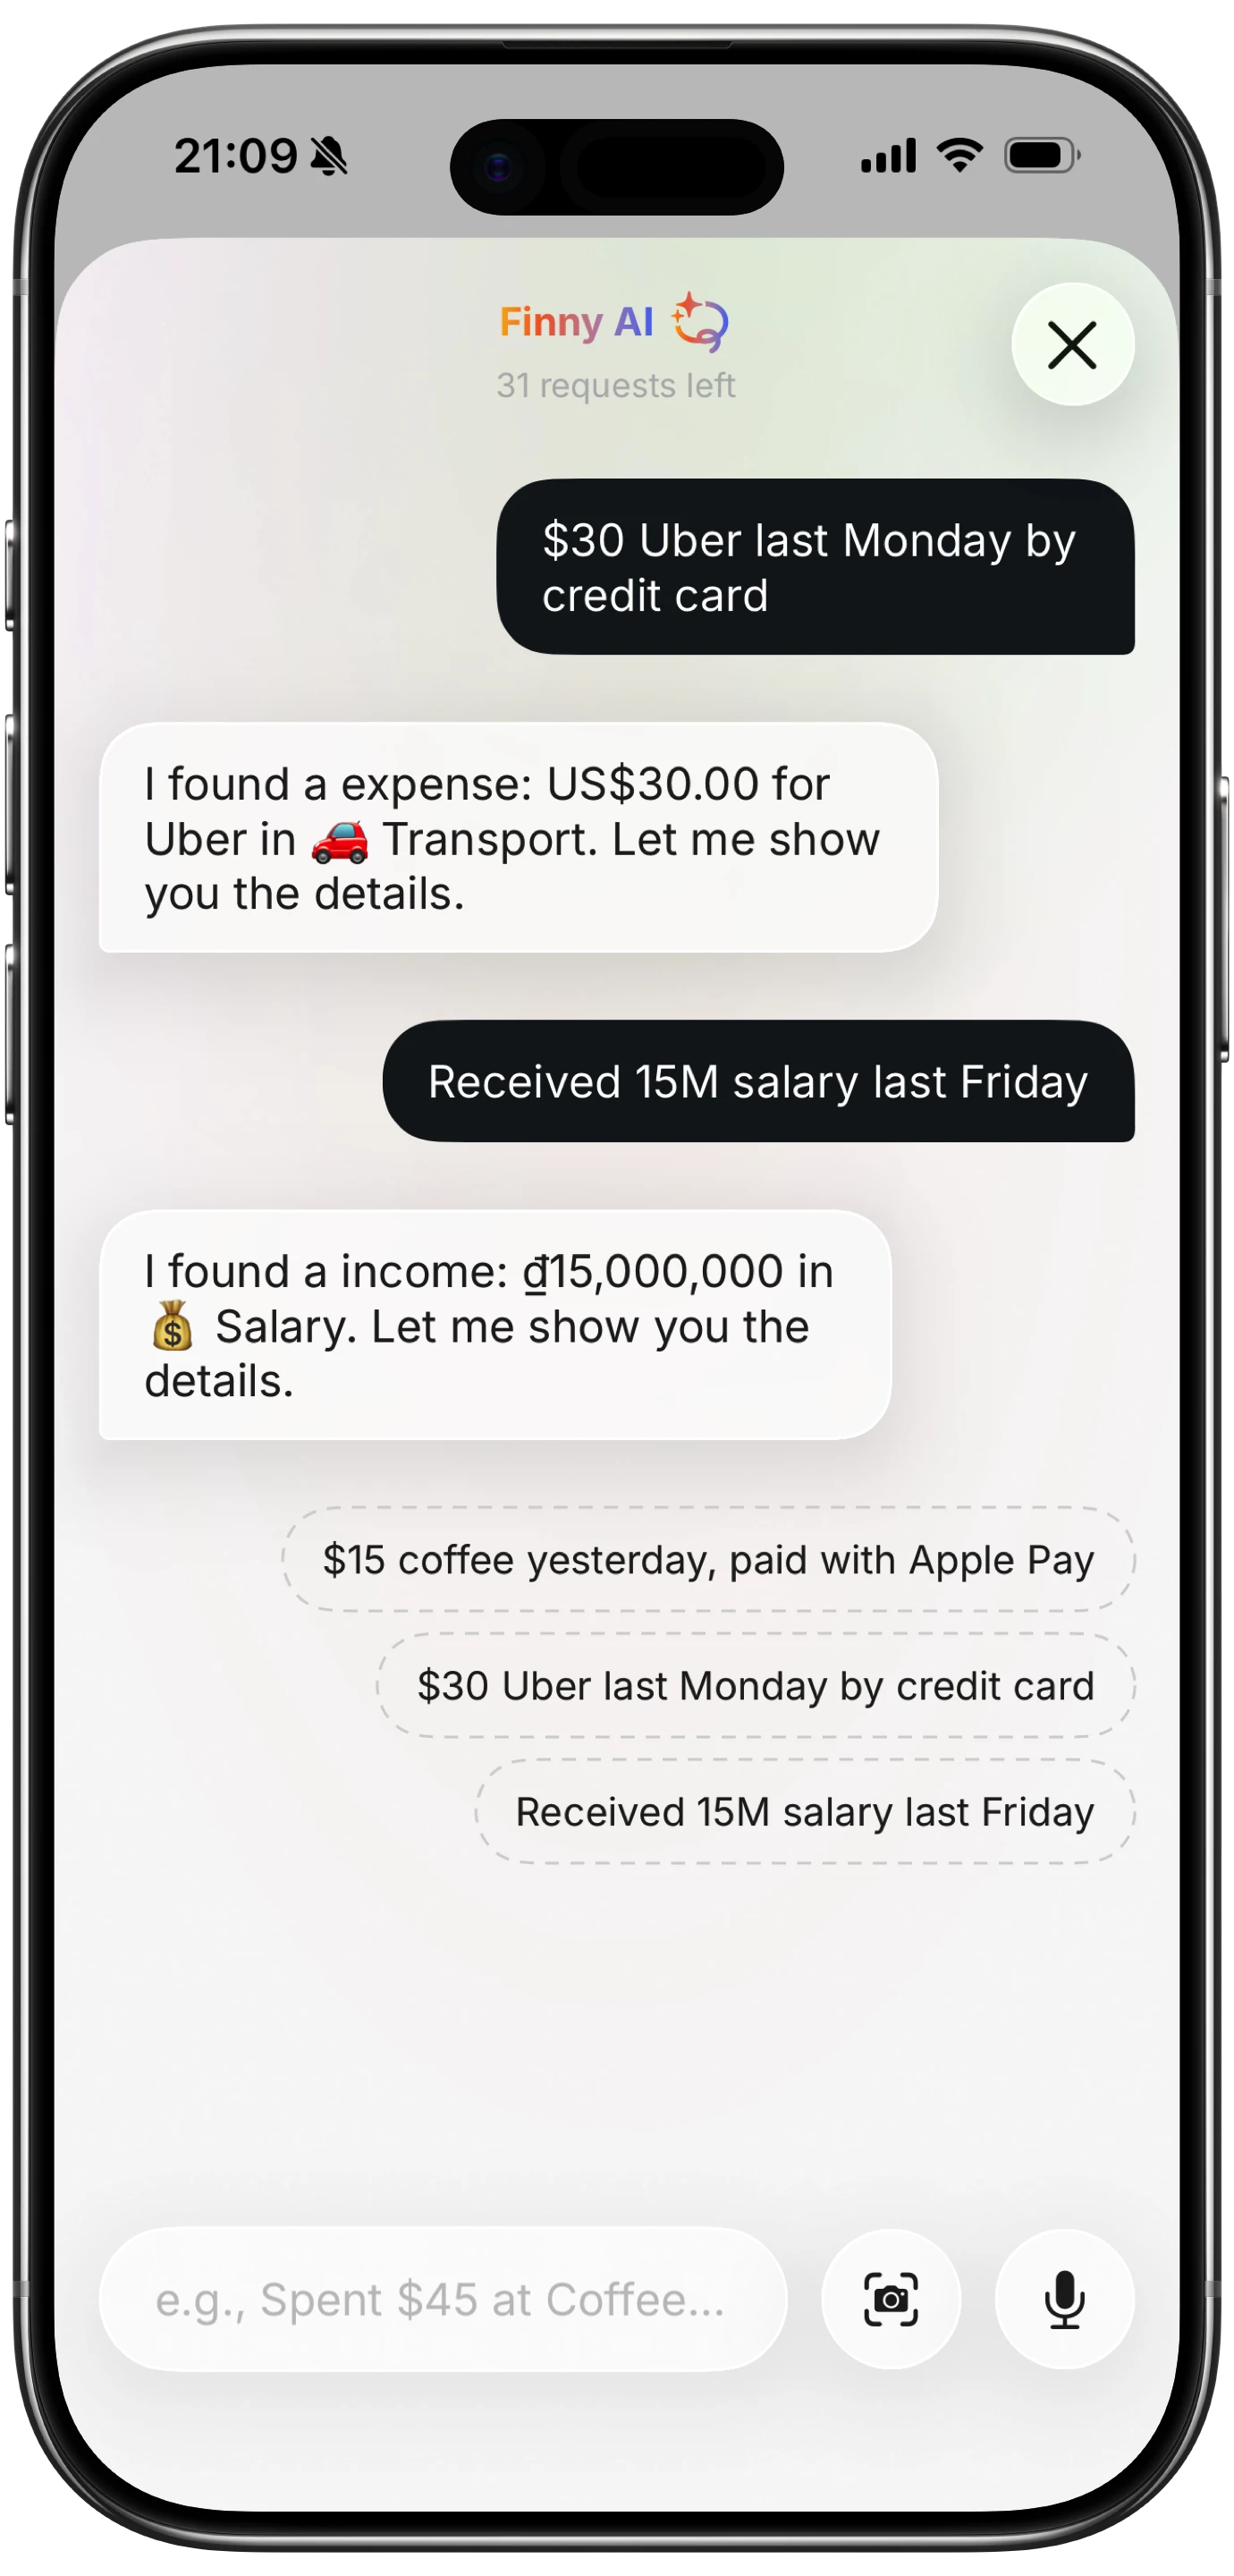
Manual-input apps keep you in control of what gets recorded. You log each expense yourself, but the app makes logging fast through smart input methods like voice, text, or receipt scanning. This approach is more private and works offline, but requires a few seconds of effort per transaction.
Best for: Anyone who wants accurate monthly totals without spending 30 minutes on data entry at month-end. Particularly useful for people who have tried spreadsheets or notebooks and stopped after a few weeks.
Drawbacks: Some apps are expensive ($10-15/month). Bank-linked apps raise privacy concerns. Free tiers often have limited features.
Comparison: Which Method Works Best?
| Criteria | Pen and Paper | Spreadsheet | Template | App |
|---|---|---|---|---|
| Setup time | None | 30-60 min | 5 min | 5 min |
| Cost | Free | Free | Free | Free to $15/mo |
| Auto-calculations | No | Yes | No | Yes |
| Charts and visuals | No | With effort | No | Yes |
| Reminders | No | No | No | Yes |
| Offline access | Yes | Partial | Yes | Varies |
| Multi-month trends | Difficult | Yes | Difficult | Yes |
| Privacy | High | High | High | Varies |
| Time per transaction | 30-60 sec | 20-40 sec | 30-60 sec | 5-15 sec |
| Consistency rate | Low | Medium | Low | High |
The pattern is clear: apps win on speed and consistency, while analog methods win on privacy and cost. Spreadsheets land in the middle on most criteria.
If you are evaluating apps specifically, our comparison of the best expense tracker apps in 2026 breaks down the top options by features and pricing.
How to Set Up a Monthly Expense Tracking System
Regardless of which method you choose, the setup process follows the same five steps.
Step 1: Define Your Categories
Start with 8-12 categories that cover your actual spending. Too few and you lose visibility. Too many and you waste time deciding where each purchase belongs.
A solid starting list:
- Housing (rent, mortgage)
- Groceries
- Dining out
- Transportation (gas, transit, rideshare)
- Utilities (electric, water, internet, phone)
- Health (insurance, prescriptions, gym)
- Entertainment (streaming, events, hobbies)
- Shopping (clothing, household items)
- Subscriptions (software, memberships)
- Personal care (haircuts, toiletries)
- Savings and investments
- Debt payments
Adjust based on your life. If you travel frequently, add a travel category. If you have kids, add childcare. The goal is categories that are specific enough to be useful but broad enough that you do not agonize over which one to pick.
Step 2: Set a Daily Logging Habit
The biggest reason people fail at expense tracking is delayed entry. If you wait until the end of the week to log expenses, you will forget transactions and estimate amounts incorrectly.
Log each expense within a few minutes of making it. If you use an app, this takes seconds. If you use a notebook, keep it in your pocket or bag. The key is reducing the gap between purchase and record.
Step 3: Schedule a Weekly Check-in
Set 10-15 minutes each week to review your running totals. This is where you catch miscategorized entries, add anything you missed, and get an early read on whether you are on track for the month.
Weekly check-ins also prevent the "month-end shock" that causes people to abandon tracking. If you know by week two that dining is already at 80% of your monthly target, you can adjust before the month ends.
Step 4: Do a Monthly Review
At the end of each month, review your complete data:
- Total spending vs. income. Did you spend less than you earned?
- Category breakdown. Which categories consumed the most money?
- Surprises. Any categories significantly higher or lower than expected?
- Recurring charges. Are there subscriptions or memberships you no longer use?
This monthly review is where tracking turns into action. Without it, you are collecting data for no purpose.
Step 5: Compare Across Months
After two or three months, start comparing totals. Month-over-month trends reveal things a single month cannot: seasonal patterns, lifestyle creep, and whether your spending cuts are actually holding.
For more on this process, read our guide on how to track expenses, which walks through each of these steps in more detail.
Tips for Staying Consistent
Consistency is the single factor that separates people who benefit from expense tracking and people who quit after three weeks. Here is what helps:
Start small. Track just one or two categories for the first week if full tracking feels overwhelming. Add more categories once the habit is established.
Use the fastest input method available. If logging takes 30 seconds, you will do it. If it takes two minutes, you will skip it when you are busy. This is where apps with AI-powered input, like voice logging or receipt scanning, have a real advantage over manual methods.
Automate what you can. If you use an app, turn on daily reminders. If you use a spreadsheet, set a recurring calendar event for your weekly review.
Do not aim for perfection. A month with 90% of transactions recorded is far more useful than zero months tracked because you gave up trying to capture everything.
Make it visible. Keep your tracker on your phone home screen, your spreadsheet bookmarked, or your notebook on your desk. Out of sight means out of mind.
What to Look for in an Expense Tracking App
If you decide to go the app route, here are the features that matter most for monthly tracking:
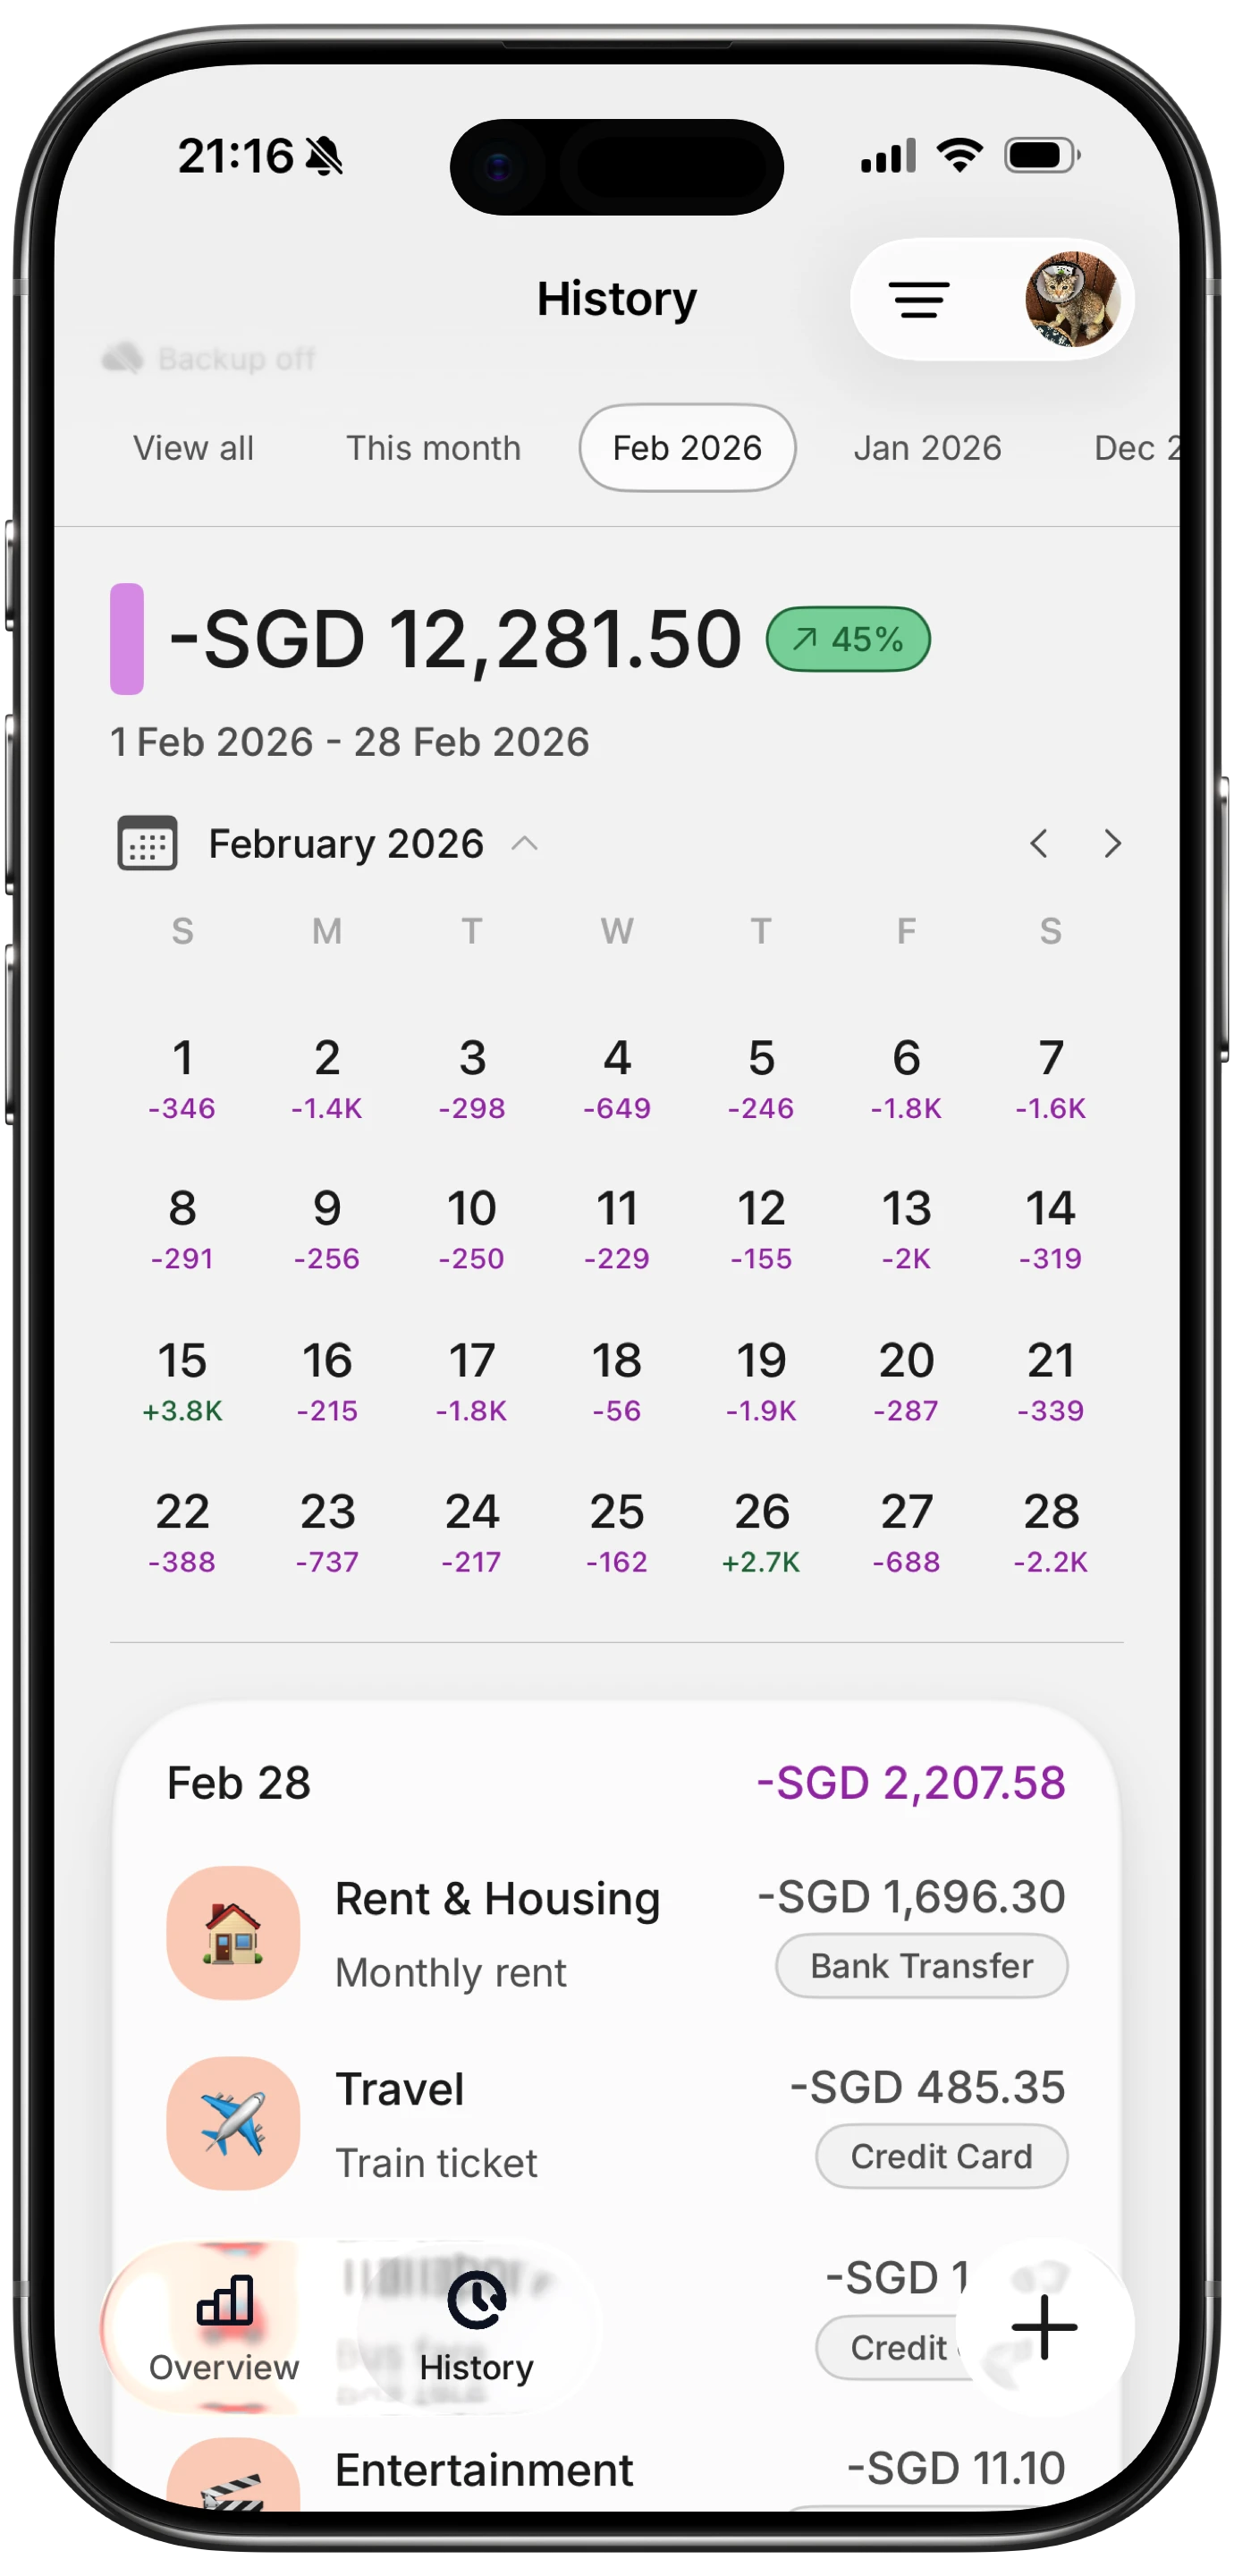
- Monthly view with category breakdown. You need to see spending grouped by category for the current month at a glance.
- Charts and trends. Visual representations make patterns obvious faster than rows of numbers.
- Custom categories. Pre-set categories rarely match your actual spending. The ability to create, rename, and merge categories is important.
- Export capability. CSV export lets you pull your data into a spreadsheet for deeper analysis or tax preparation.
- Fast input. Every extra tap or field you have to fill out reduces the odds you will log consistently. Look for apps that let you record an expense in under 10 seconds.
- Offline support. If the app requires internet to log a transaction, you will miss entries whenever you are in a dead zone or on a plane.
Apps like Finny are designed specifically around fast input and monthly analytics, using AI to handle categorization from text, voice, or receipt photos so you spend less time on data entry and more time reviewing your actual numbers.
For a broader look at money management tools, check out our list of the best money tracker apps in 2026.
Frequently Asked Questions
What is the simplest way to track monthly expenses?
The simplest way is to use an expense tracking app with a monthly view. Apps calculate totals, categorize spending, and generate charts automatically. If you prefer not to use an app, a basic spreadsheet with date, description, category, and amount columns works well. The best method is whichever one you will actually use every day.
How many categories should I use?
Start with 8-12 categories. Fewer than eight hides important spending patterns (lumping groceries and dining together, for example, makes it hard to see where food money actually goes). More than 15 creates decision fatigue every time you log a transaction. You can always split or merge categories after a month or two of data shows you what matters.
Should I track fixed expenses like rent, or just variable spending?
Track everything. Fixed expenses like rent, insurance, and loan payments are predictable, but they still matter for understanding your total monthly outflow. They also change occasionally (rent increases, insurance renewals), and tracking them ensures those changes do not slip by unnoticed.
Is a free spreadsheet better than a paid app?
It depends on consistency. A spreadsheet is free and fully customizable, but it requires manual entry and discipline. Paid apps (typically $2-15 per month) reduce friction with features like receipt scanning, voice input, and automatic categorization. If you have tried spreadsheets before and stopped using them, an app is worth the small cost because a tool you actually use beats a free one you abandon.
How long does it take to see results from monthly tracking?
Most people notice useful patterns within two to three months. The first month establishes your baseline. The second month gives you something to compare against. By the third month, you can identify trends, spot problem categories, and make informed adjustments. Many people find that the simple act of tracking reduces their spending by 10-15%, even before they make deliberate changes, because awareness itself shifts behavior.
Start Tracking This Month
You do not need a perfect system to start. Pick one method from this guide, set up your categories, and begin recording your spending today. The data from even a single month will tell you more about your financial habits than years of guessing.
If you want to try the app approach with fast AI-powered input and built-in monthly analytics, download Finny and see your first monthly summary take shape in real time.


